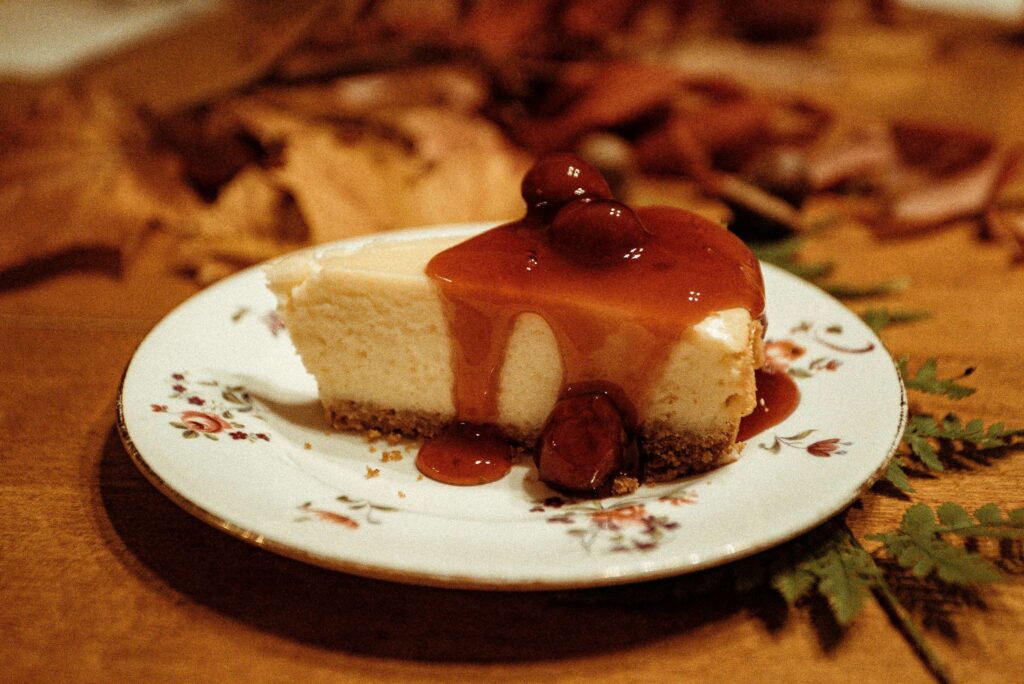
If you’re craving a decadent, creamy dessert but don’t want to turn on your oven, a no-bake cherry cheesecake is the perfect solution. This simple, no bake version of the classic cheesecake is ideal for warm weather when the last thing you want is to deal with a hot oven. With a buttery graham cracker crust, a velvety cheesecake filling, and a luscious cherry topping, this dessert comes together in a flash—and it’s sure to impress your friends and family.
In this post, we’ll guide you through a foolproof, no bake cherry cheesecake recipe, plus some tips and tricks to make it even more customizable.
Why You’ll Love This No-Bake Cherry Cheesecake
- No oven required: Perfect for hot summer days when you want to make dessert without heating up the house.
- Easy to make: With only a few ingredients, this cheesecake comes together in under 20 minutes. The hardest part? Waiting for it to set!
- Crowd-pleaser: Creamy, sweet, and topped with bright, tangy cherries, this cheesecake is a guaranteed hit at parties, family gatherings, or BBQs.
- Customizable: The basic recipe can be adapted to suit your preferences—change the fruit topping, swap out the crust, or even experiment with different flavors in the cheesecake filling.
No-Bake Cherry Cheesecake Ingredients
For the Crust:
- One and a half cups of crushed graham cracker crumbs (roughly twelve to fourteen graham crackers)
- One-third cup of powdered sugar
- Six tablespoons of melted unsalted butterSix tablespoons of melted unsalted butter
For the Cheesecake Filling:
- 8 ounces of softened cream cheese
- 1 cup heavy whipping cream
- 1 cup powdered sugar
- 1 tsp vanilla extract
- 2 tbsp lemon juice (optional, but helps balance the sweetness)
For the Cherry Topping:
- 1 jar (about 14 oz) of cherry pie filling, or fresh cherries if in season
How to Make No-Bake Cherry Cheesecake
Step 1: Make the Crust
The crust is the foundation of any great cheesecake, and for this no-bake version, we’re using a simple graham cracker crust.
- Crush the graham crackers: Start by crushing your graham crackers into fine crumbs. You can do this by placing them in a zip-top bag and using a rolling pin or by pulsing them in a food processor. You’ll need about 1 ½ cups of crumbs.
- In a medium bowl, mix together the melted butter, granulated sugar, and graham cracker crumbs to form the crust. Stir until the mixture has the consistency of wet sand and holds together when pressed.
- Press into the pan: Press the crumb mixture into a springform pan or the bottom of a 9-inch pie dish. Press into the pan: Press the crumb mixture into a springform pan or the bottom of a 9-inch pie dish. Press into the pan: Press the crumb mixture into a springform pan or the bottom of a 9-inch pie dish. Use the back of a spoon or the bottom of a glass to pack it down firmly. Chill the crust in the fridge for about 10-15 minutes while you prepare the filling. This step helps the crust set and become firm.
Step 2: Make the Cheesecake Filling
Now for the creamy, dreamy cheesecake filling:
- Beat the cream cheese: In a large mixing bowl, beat the softened cream cheese with a hand mixer or stand mixer until smooth and creamy. To guarantee a velvety texture for your filling, make sure there are no lumps.
- Add vanilla and powdered sugar: Beat the cream cheese until smooth and well combined after adding the powdered sugar and vanilla extract.
- Beat the heavy cream: Beat the heavy cream in a different bowl until it forms stiff peaks. This means when you lift the beaters, the cream holds its shape without collapsing.
- Fold the whipped cream into the cream cheese mixture: Gently fold the whipped cream into the cream cheese mixture with a spatula. Be careful not to deflate the whipped cream—this will help your cheesecake stay light and airy.
- Add lemon juice (optional): For a little tang and extra flavor, fold in the lemon juice.
Step 3: Assemble the Cheesecake
- Fill the crust: Once the filling is smooth and well-combined, pour it into the chilled graham cracker crust. Use a spatula to smooth the top into an even layer.
- Chill: To enable the filling to set, place the cheesecake in the refrigerator for at least four hours, or better yet, overnight. It will get firmer the longer it chills. Additionally, it allows time for the flavors to combine.
Step 4: Add the Cherry Topping
Once your cheesecake has set and you’re ready to serve, it’s time to add the cherry topping:
- Top with cherry filling: Spoon the cherry pie filling or fresh cherries on top of the cheesecake. If you’re using canned cherry pie filling, spread it over the top. For fresh cherries, you can either slice them or leave them whole, depending on your preference.
- Chill again (optional): You can place the cheesecake back in the fridge for an additional 30 minutes to help the topping firm up. However, if you’re eager to dig in, you can serve it right away!
Tips for the Best No-Bake Cherry Cheesecake
- Use full-fat cream cheese: For the creamiest and richest texture, opt for full-fat cream cheese. Lower-fat versions can affect the consistency and flavor of the filling.
- Make it ahead of time: This cheesecake is perfect for making in advance. It can be prepared the night before your event, saving you time and hassle on the day.
- Crust alternatives: If you’re not a fan of graham crackers, you can swap them out for other cookie crumbs, such as Digestive biscuits or vanilla wafers. You could even use a gluten-free cookie for a gluten-free version.
- Add zest for extra flavor: If you like citrus, try adding lemon or orange zest to the cheesecake filling for an added burst of flavor.
- Variations on the topping: Although cherries are a traditional choice, you can try fresh strawberries, blueberries, raspberries, or even a combination of tropical fruits like pineapple and mango. For a chocolate twist, you can also use chocolate ganache or shaved chocolate.
How to Serve and Store No-Bake Cherry Cheesecake
Serving: This cheesecake tastes great by itself, but for a little extra flair, you can top it with whipped cream, fresh mint leaves, or more fruit. It’s perfect for serving at parties, BBQs, or as a weeknight treat after dinner.
Any leftover cheesecake should be covered with plastic wrap or stored in the refrigerator If you are making it for a party, it is best to make it a day or two in advance for the best texture and flavor.in an airtight container. It will stay fresh for four or five days. It is best to prepare it a day or two ahead of time for the best texture and flavor if you are making it for a party. Click here for more info
Conclusion
This no-bake cherry cheesecake is a showstopper of a dessert that’s as easy to make as it is delicious. With a buttery graham cracker crust, a creamy cheesecake filling, and a sweet cherry topping, it’s a perfect treat for any occasion. Whether you’re celebrating summer, hosting a dinner party, or just looking for a quick and satisfying dessIn conclusionIn conclusionert, this cheesecake will be a hit with everyone. So, gather your ingredients, chill the cheesecake, and enjoy the creamy, fruity indulgence that’s sure to be your new go-to dessert

